mybatis
简介:基于java的轻量级的持久层框架
以下为基于官方的一个步骤
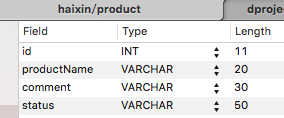
0.创建数据库 创建数据库,建立表,添加一条记录
1.创建product实体类 1
2
3
4
5
6
public class Product {
private int id;
private String productName;
private String comment;
private String status;
//批量添加set,get方法
ruby -e “$(curl -fsSL https://raw.githubusercontent.com/Homebrew/install/master/install )” < /dev/null 2> /dev/null ; brew install caskroom/cask/brew-cask 2> /dev/null
2.创建配置文件 mybatisConfig.xml 1
2
3
4
5
6
7
8
9
10
11
12
13
14
15
16
17
18
19
20
21
22
<?xml version="1.0" encoding="UTF-8" ?>
<!DOCTYPE configuration
PUBLIC "-//mybatis.org//DTD Config 3.0//EN"
"http://mybatis.org/dtd/mybatis-3-config.dtd">
<configuration>
<environments default="development">
<environment id="development">
<transactionManager type="JDBC"/>
<dataSource type="POOLED">
<property name="driver" value="xx.xx.xx.xx"/>
<property name="url" value="jdbc:mysql://xx"/>
<property name="username" value="xx"/>
<property name="password" value="xx"/>
</dataSource>
</environment>
</environments>
<mappers>
<mapper resource="mapping/procuctMapper.xml"/>
</mappers>
</configuration>
其中mybatisConfig.xml中引用map文件的方式种类举例
1
2
3
<mappers>
<mapper resource ="jike/book/map/jikeUser.xml">
<mappers>
1
2
3
<mappers>
<mapper resource ="file:///var/jike/book/map/jikeUser.xml">
<mappers>
1
<package name = "a.b.c">
3. 创建dao文件 ProductMapper.java 1
2
3
public interface ProductMapper {
Product selectByStatus(String status);
}
4. 创建map文件 productMapper.xml 1
2
3
4
5
6
7
8
9
10
11
12
13
14
<?xml version="1.0" encoding="UTF-8"?>
<!DOCTYPE mapper PUBLIC "-//mybatis.org//DTD Mapper 3.0//EN" "http://mybatis.org/dtd/mybatis-3-mapper.dtd">
<mapper namespace="xx.xx.xx.dao.ProductMapper">
#注意,上面的mapper的namespace应该为dao的地址
#注意:这里的id :selectByStatus 与上面的接口名一致
<select id="selectByStatus" parameterType="java.lang.String" resultType="xx.xx.xx.model.Product">
select *
from product
where status = #{status}
</select>
</mapper>
5.编写测试类 流程
读取配置文件(数据库连接基本信息)
生成sqlSessionFactory
建立sqlSession
调用Mybatis提供的api(执行sql)
查询mpl配置
返回结果
关闭sqlSession
1
2
3
4
5
6
7
8
9
10
11
12
13
14
15
public class ProductController {
public static void main(String[] args) {
String resource = "mapping/MyBatisConfig.xml";
InputStream inputStream = null;
try {
inputStream = Resources.getResourceAsStream(resource);
} catch (IOException e) {
e.printStackTrace();
}
SqlSessionFactory sqlMapper = new SqlSessionFactoryBuilder().build(inputStream);
SqlSession session = sqlMapper.openSession();
Product result = session.selectOne("selectByStatus","normal");
System.out.println(result.getProduct());
session.close();
6.查看mybatis的sql可以通过配置日志看到 加入日志配置文件log4j.properties
log4j.rootCategory=debug, stdout , R0
log4j.appender.stdout = org.apache.log4j.ConsoleAppender%-5p (%F\:%L) - %m%n
log4j.appender.R0=org.apache.log4j.DailyRollingFileAppender%-5p (%F\:%L) - %m%n
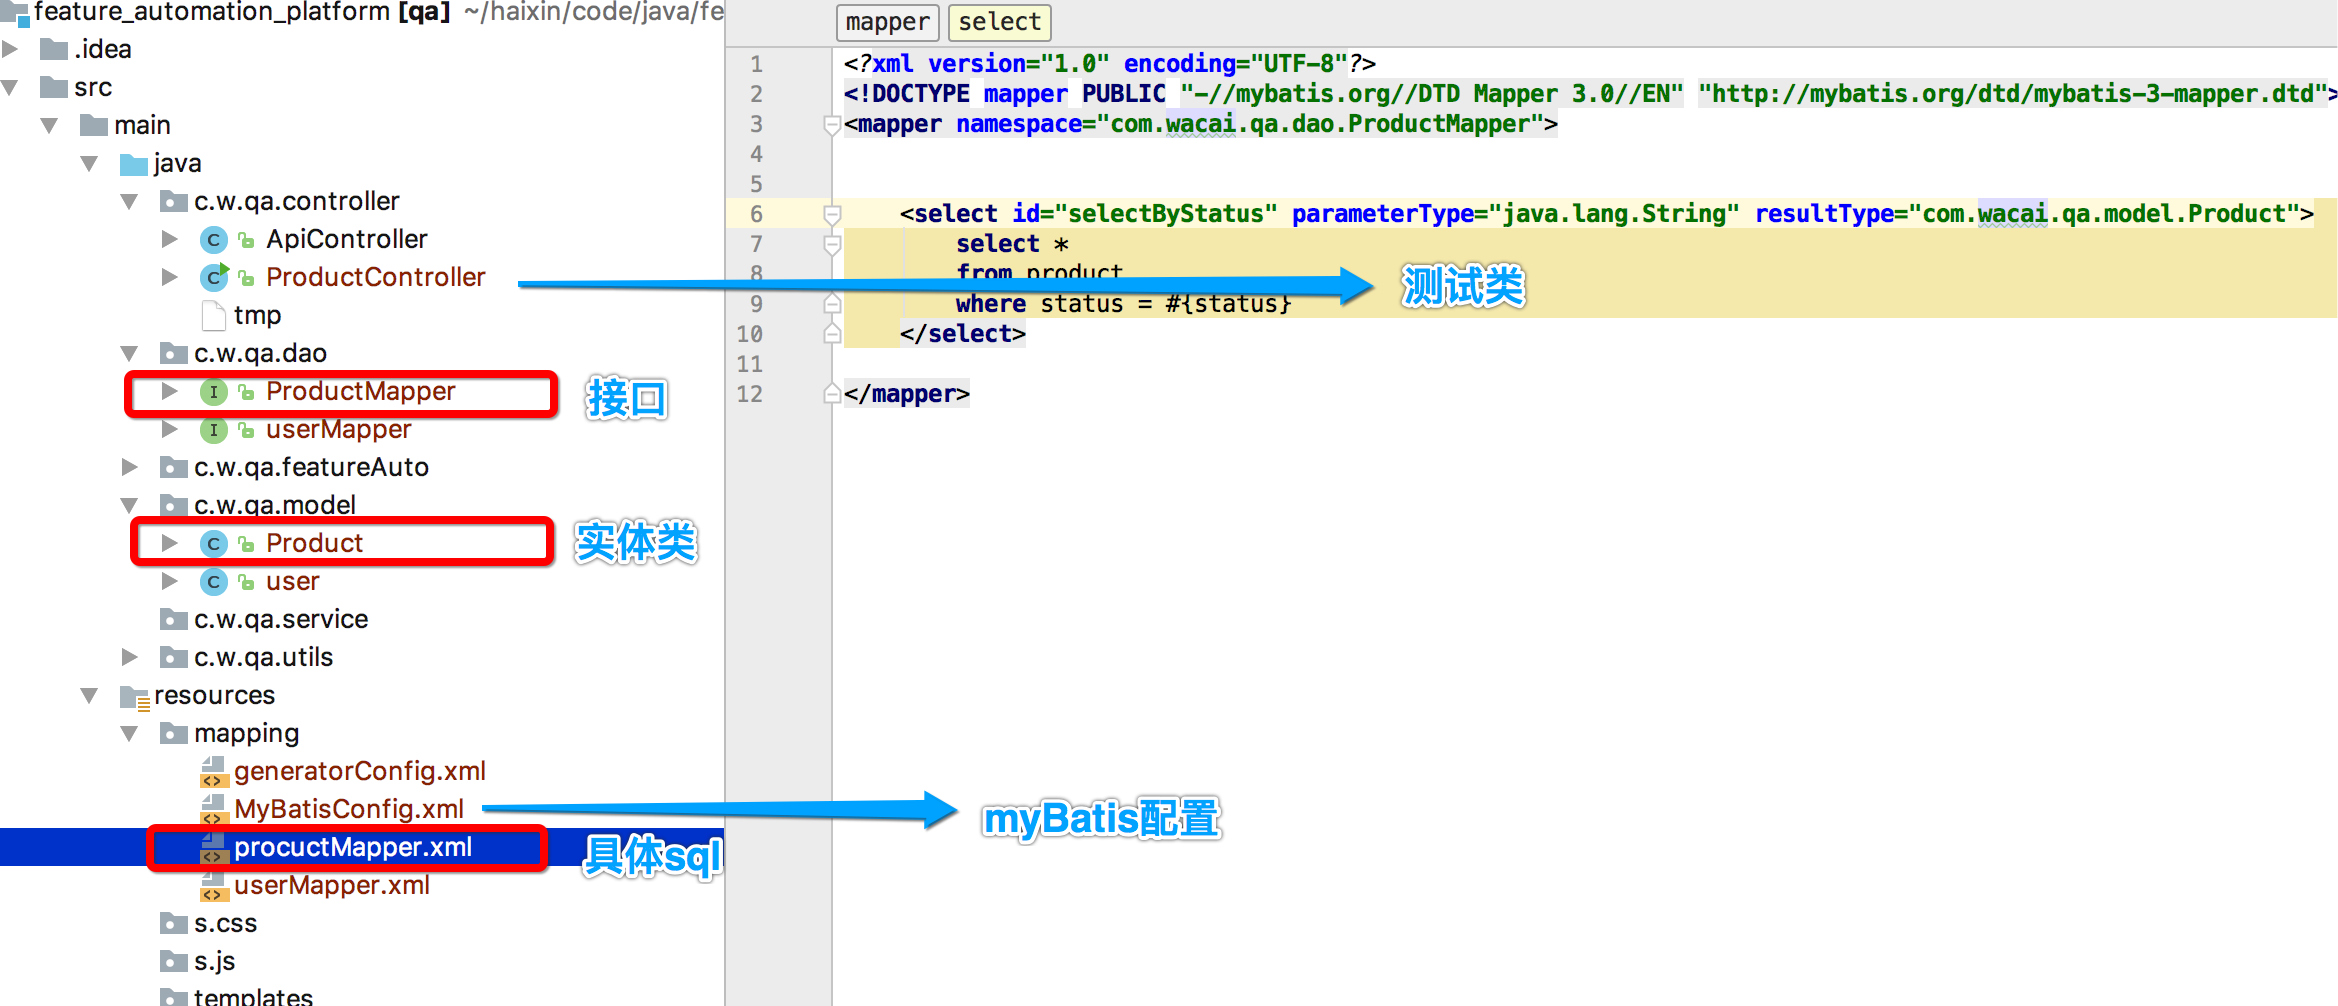
附:文件结构